

13 hours ago
Thursday, August 19, 2010
It's a good day
when there are no tears at the school sneak peek! I'm telling you, my stomach was a nervous wreck this morning getting ready to leave for our girls' sneak peek at school! You know, there is always that one teacher you don't want your kid to get. The grade we were concerned about has one that yells a lot and apparently slams doors (she cracked her classroom door window last year). So, the kids are terrified of her (and so are the parents!) Of course, I had to text my girlfriends (who got there before I did) to relieve me of my stress...just tell me my E. didn't get the door slammer! Fortunately, I was able to tell E. before we got in the car that she could relax because I got the text that confirmed she did not get "that one" and that is all we needed to hear. And sweet little K. got E.'s kindergarten teacher which is so awesome! K was very nervous and shy, but she will love it after a few days. So, all in all it's a good day!
Tuesday, August 17, 2010
Party Banners

There are quite a few tutorials out there for these cute little party banners - so this is definitely not something new. But, I thought I would at least share with you how easy and fun this project is! I've had some kid-friendly fat quarters in my stash for quite awhile. So long in fact that I can't remember why I originally purchased them. In any case, they made this project super duper easy! The finished banner has 12 double-sided triangles and I used 2 packages of bias tape.
To start, fold each fat quarter in half with right sides together (I folded it at the short ends). Trace a triangle (whatever size you want...mine is about 12" ) onto freezer paper. This is my favorite way to use patterns because, well, I'm quite lazy and this is so much quicker than pinning! Iron the triangle pattern onto fabric and cut. This will give you 2 triangles - but don't separate them - they are ready for sewing. Iron the freezer paper triangle onto the FQ again and cut another set. I could get two cuts from one FQ - not the best use of material but I'm no good at math and didn't want to figure out what size triangle would yield 3 cuts.

Once you have cut all of your triangles, you are ready to sew. Leave the top end open for turning. (If you cut on the triangles on the fold, just cut along the fold before you sew to create the opening for turning). This unfinished top end will be hidden in the bias tape. Once sewn (I used a 1/4" seam) turn the triangles and use a chopstick or something like that to poke out the point. I had a couple of helpers to help me turn and poke and I had the iron and starch going. A nice little assembly line if you ask me. Top stitch each triangle after pressing.
Join the two pieces of bias tape together ( you'll have a long 6 yard piece). Starting in the middle, pin the triangles inside the fold of the tape with the top corners touching each other. Pin so that you can easily remove the pins as you sew. Starting at one end of the bias tape, sew all the way to the other end catching the triangles in the fold as you go. Voila! So easy! What a cute party banner and it's reusable too!
 Susan
Susan
Sunday, August 15, 2010
Lounge Pants
 Me? Making something that someone can actually wear? I truly didn't think it was possible. I'm usually not a pattern person because I don't really have confidence in myself to be accurate with measurements and seam allowances. So, I've never tried any type of apparel that has to fit (aprons and flirty girly skirts don't count...elastic waistbands I can do!).
My oldest d. has been looking for some cute pj bottoms for awhile and we just haven't found anything she likes. So, I downloaded the Easy Fit Pants pattern by the Scientific Seamstress on You can Make This.com - it's fantastic! If I can do this, anyone can. Carla details out everything you need to know and has some great tips along the way. Once I cut the pattern out, they took maybe an hour to make. Probably less but I had some little giggling interuptions along the way. I actually used a pair of my daughters pj bottoms to measure the length instead of using the size chart in the pattern. I'm now looking for an adult version of this pattern - I've already purchased some fabric to make myself a pair.
I also whipped up a pair of pj shorts from the same pattern. I think they are adorable, but dear d. says the fabric really isn't her. I reminded her they are to sleep in and she said that she would wear them to bed but not for a sleepover. Girls are funny aren't they? I really encourage you to try this pattern if you are new to sewing or if you haven't made pants before. Just make sure you have prewashed fabric ready to go since this is a downloadable pattern. If you're anything like me, you'll want to get started right away!
 Susan
Susan
Sunday, August 1, 2010
Sunday Sewing...
 Forgive the awful photo - nice and blurry huh? I made this full apron for my aunt for her 70th birthday and forgot to snap more photos before I packaged it all up. I know, it looks like a 1/2 apron in the pic but I had to crop out all of the junk on my countertops! Anyway, I do love the way it turned out - I snatched up these fabrics on clearance recently with the intent of using them in a quilt. But when my mom called to ask if I had any ideas for a birthday gift for my aunt, well, I thought these colors would be perfect for an apron and I had just enough fabric. Not only is my aunt a great lady, but she's also a fabulous cook too, so I do hope she enjoys it. Hope ya'll are having a fantastic weekend!
Eco-Friendly Dollhouse GIVEAWAY!
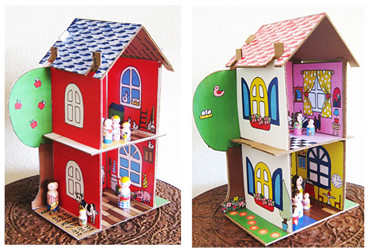
Sarah’s hosting a fabulous Giveaway over at Dolls And Daydreams for her Eco Friendly Doll House PDF pattern!
Let your children’s imaginations grow whilst learning about recycling at the same time!
I’ve entered, how about you? Fingers crossed!! Good luck everyone!!
Subscribe to:
Posts (Atom)